How to Setup SOCKS Proxy
Blog post created on 2016-02-07
There are a lot of reasons you might need a proxy and with VPS providers readily available it is possible to get going in less than a few minutes. Additionally, VPS providers often charge by the hour reducing your cost considerably and allowing you to switch off/on your proxy as needed. For the purposes of this tutorial let us assume you are outside of the UK and you need a proxy within the UK:
- Head over to DigitalOcean and create/setup an account;
- Once logged in click on create droplet;
- Select the following settings:
- CentOS;
- $5/month;
- London;
- One droplet;
- A hostname of your choice (you can also leave the default);
- Click on create;
- Wait for the email to arrive in your inbox and connect to the droplet via SSH or PuTTY (if on Windows).
The droplet will require you to change your default password but that is expected. Once you are logged in with root setting up a SOCKS proxy is tremendously easy. So easy, in fact, that it can be achieved with one simple command:
ssh -f -N -D 0.0.0.0:28128 localhost
Once you have run the command you can change your browser settings, for example, to use the proxy.
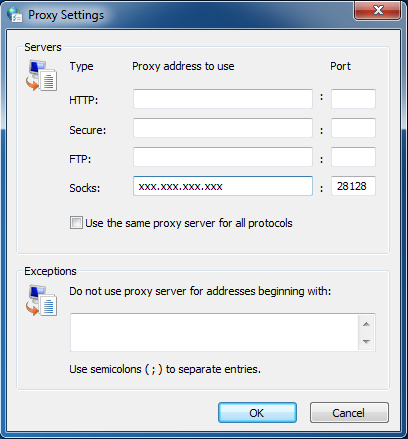
The settings are found in different places depending on your OS. On Windows you need to head over to Internet Options -> Connections -> LAN Settings -> tick the Proxy Server box -> Advanced and finally set the dialog as in the image below replacing the x characters with the IP address of your VPS.

The ssh command has a SOCKS server built in. Let us analyze the command in detail:
- -f: sends SSH into the background so it does not block your current shell;
- -N: tells SSH not to execute any remote command;
- -D 0.0.0.0:28128: Specifies a local “dynamic” application-level port forwarding. This works by allocating a socket to listen to the specified port on the local side, optionally bound to the specified bind address. Whenever a connection is made to this port (in our example 28128), the connection is forwarded over the secure channel, and the application protocol is then used to determine where to connect to from the remote machine. Effectively, this is our SOCKS proxy. 0.0.0.0 is a special IP address that simply tells SSH to listen on all IPv4 addresses available on the current machine (for simplicity);
- localhost: simply the machine we want to turn the proxy on;
And there you have it, your 5 minute SOCKS proxy. When you are done you can simply destroy the droplet from the DigitalOcean interface.